Section 19.6: Resetting service indicator lights
Most people I know think the BMW service indicator light cicuit is totally
useless. However noone wants the damn lights on all the time and some people
(like me) like to keep everything working. So here's a file I've been compiling
on the subject. I've not check this on early model (pre '88) cars but it's
accurate for the later models. I've also not given credit for some of the
material because I forgot where I got it. Anyway here it is:
BMW Service indicator lights FAQ.
- --------------------------------
The service indicator lights are reset through a pin in the diagnostic
connector located in the engine compartment.
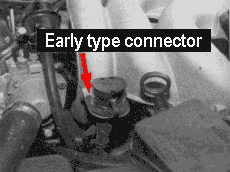
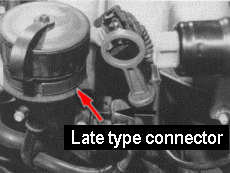
There are 2 types of diagnostic connectors used on BMWs. One is a 15 pin
connector used on 1987 and earlier cars, the other is a 20 pin connector used on
1987-on cars. In what follows the 15 pin connector is referred to as the early
type and the 20 pin as the late type. Resetting the service indicator lights is
described below. The most common problem with resetting the service lights is
bad NiCad batteries in the instrument cluster. The batteries seem to fail pretty
consistently after 4 years.
The symptoms of this are:
1. The inspection light comes on.
2. Resetting the light according to the instructions below either doesn't
work or works for a short period of time and then the inspection light comes
back on.
The fix for this is to replace the batteries as described below.
Relevant Roundel references:
- ---------------------------
The Roundel is the monthly publication of the BMW Car Club of America.
Jan 1992, Nov 1991, Dec 1989, May 1988 -- Resetting the service indicator
lights
Nov 1991 -- Replacing the Nicads.
Resetting the service indicator lights.
- --------------------------------------
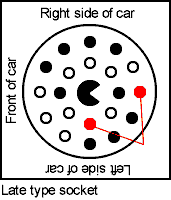
Late type connector:
The service indicator lights are reset by connecting pin 7 to pin 19(ground).
The proper way to do this is to have the ignition off and place a jumper wire
between pins 7 and 19 (make sure you get the right pins!). Then turn the
ignition switch to position 1 (accessory), when the service light goes out, turn
the ignition off. The difference between resetting the oil service light and the
inspection light is in the length of time you have the jumper in place with the
ignition on. This means that if you are resetting the oil service light, you
should turn off the ignition immediately after the light goes out. If you leave
the jumper in too long with the ignition on, you will perform an inspection
reset as well and the next service indicator will come up as an oil service
rather than an inspection.
The service light reset tools that I have seen connect to 3 pins of the
diagnostic connector: pin 7,14 and 19. The connection to 14 is to power the
tool. The less sophisticated tool has only one switch that connects pin 7 to 19.
While those pins are tied together a red LED blinks to measure time. You count
blinks and manually turn off the tool after the appropriate number of counts for
oil or inspection reset. The more sophisticated tool has two switches, one for
oil reset, one for inspection. It must have a built in timer that jumps pin 7 to
19 for the correct time.
Early type connector:
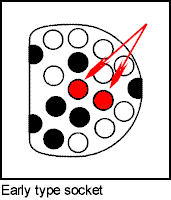
The procedure is the same as above, but you jumper pin 7 (the service
indicator pin) to pin 1 (the ground pin).
The early type connector:
The early type connector:
                        *******
                    ****       ****
                 ***      (10)      ***
               **  (9)          (11)  ***
              *                         *
             *          (2)             *
            * (8)               (3)     *
           *                            *
           *       (7)                  *
           *              (1)           *
           *                      (4)   *
           *                            *
            *        (6)                *
             * (15)          (5)        *
              *                         *
               **  (14)         (12)  ***
                 ***      (13)     ***
                    ****       ****
                        *******
Diagnosis plug connections:
No.     Terminal        Designation
1       31              Ground
2       -               -
3       -               -
4       FT              Temperature gauge
5       L               Engine M10B18 Interfrator output for CO adjustment
                        Engine M30B34 Oxygen Sensor signal
6       A               Diagnosis lead for SRS
7       SI              Service indicator
8       P+              Position sender
9       S               Shielding
10      P-              Position sender
11      50              Starting pulse for starter
12      61              Alternator charge indicator
13      1               Ignition signal
14      30              battery +
15      15              Power supply for ignition
The late type connector:


                        **   ***
                    **** *****  ****
                 ***      (1)       ***
               **  (12)         (2)   ***
              *                         *
             * (11)    (20) (13)    (3)  *
            *                             *
           *  (10)  (19)       (14)   (4)  *
           *                               *
           *                   (15)        *
           *  (9)    (18)             (5)  *
           *                  (16)         *
            *            (17)             *
             **   (8)             (6)   **
               **                     ***
                 ***     (7)       ***
                    ****       ****
                        *******

     Pin    Wire Size   Wire Color   Circuit and Component Connected
    -----  ----------- ------------ ---------------------------------
      1         1          BK        Ignition Coil, Motronic Control Unit

      6        0.5       WT/BK       SRS Connector (Not Used)

      7        0.5       WT/GN       Service Interval Indicator, Service
                                     Interval Processor(Reset).

     11        2.5       BK/YL       Starter, Start Signal(50)
     12        0.75        BU        Charge, Alternator(D+)
     14        2.5         RD        Battery
     15        0.5       WT/YL       Motronic Control Unit(RXD)
     16        1.5       GN/WT       Oxygen Sensor
     18        0.5       GN/BU       Motronic Control Unit(Programming Voltage)
     19        1.5BR       BR        Ground Distribution(G103)
     20        0.5       WT/VI       Motronic Control Unit(TXD)
The Dummy plug.
- ---------------
Late models:
The cap on the diagnostic connector is actually an electrical connector that
shorts together the following pins:
- --pins 18 and 20 to pin 19.
- --pin 14 to 15.
==============================================
And here's another....
==============================================
Subject: Re: Reset Tool
Years ago on my E30, I was one of the first persons to realize that grounding pin 7 of the diagnostic connector would reset the service lights. I found that grounding pin 7 for ~3 seconds applied to an oil reset and that ~9 seconds applied to the inspection reset.
I made up a wire jumper using a copper Mueler alligator clip and banana plug (male pin) that would accommodate the diagnostic female pin. Rather then short the two pins within the diagnostic connector, I decided to attach the alligator clip to engine ground and connect the male pin to diagnostic pin 7 (less chance for error). I also embbeded a 500 ohm resistor in series within the banana plug. This limited the current to ~25 ma. in case you went to the wrong pin. As a side note, the reset on an F100 jet engine diagnostic unit is defined as 50 ohms or less to ground. I made a bunch of these for people that didn't want to be bothered making their own. I still use one to reset the lights on my Sweethearts '84 528e.
I'm two lights away from a BMW oil service on my ti. I plan on designing a similar (in concept) item for it and my 328. On the newer cars it appears that you have to provide the short and then remove it, after some time, to reset the lights. Looking in to this, is on my things to do list. Will write up a how to, when I'm done.
http://www.eskimo.com/~dalus/bmw/bmw_ronstygar.html


